Thursday, August 11, 2011

Hot and Cold Boo-Boo Kitties

I am pretty accident prone so I was super excited when I found this free pattern and tutorial from: http://downwithclutter.blogspot.com/2009/03/make-your-own-boo-boo-buddy.html
Also seen on http://sewing.craftgossip.com/tutorial-sew-a-boo-boo-buddy/2009/12/26/

The only changes I made was enlarging the pattern, the addition of a tail (extended the leg pattern to make the tail pattern), and i filled it with rice.

I also decided to make 2.  One to be microwaved as a heating pad (I embroidered a red heart), and the other to live in the freezer as an cold pack (I embroidered a blue heart). I thought it was important to easily tell the difference (so I don't have to memorize stripe patterns and nose sizes).  If I kept it in the freezer it might gain moisture, then microwaving it, it would probably cook the rice and ruin the cat. 

Materials:
Towel- I definitely recommend a towel with stripes. I went to Wal-mart and I really liked the colors... It is a full sized towel, so I will be able to make more stuff with it.  The pattern recommends one 12 x 12 inch towel for one cat.
Thread- to match the towel, black, red, and blue
Filling- I used uncooked rice, you could also use beans or a few different things (wheat, feed corn, buckwheat hulls, barely, oatmeal, flax seed, cherry pits....)

Step 1: Cut out the pattern

 I used different parts of the stripes to make it funner.

Step 2: Embroider the heart on one side of the leg at this step unless you want it on both sides of the foot.  Sew together the legs, tail, and ears and inside them out.  Then embroider the eyes and nose.  Then pin it to one side of the body, then lay the other side of the body on top and sew around the big ovaly shape leaving a hole to inside it out and add the filling.
Step 3: Inside it out then add your filling.  Using a funnel helps, even if you have to make one out of paper and tape (which is what I did).
Step 4: Close it up

Step 4: Embroider the heart on the foot for whatever use your kitty is for (though I recommend you do this part at step 2)

Then repeat all the steps on a second kitty.
Then you are all done and prepared for all the bumps and pains in life!
Heating Pad Kitty:
Microwave for about a minute (1 minute was a little too long for me personally until I fanned it off a bit), it takes some experimenting to get the right timing and it depends on how big you make yours. Make sure you keep an eye on it and be careful not to burn yourself.
Good for headaches, muscle aches, cold fingers and toes in the winter....

Cold Pack Kitty:
Keep it in your freezer for whenever you need it.  I will keep mine in a plastic bag so it stays away from all of the food and potential smells.
Good for swelling, bruises, very minor burns, stomach aches, summer heat....


Tuesday, August 9, 2011

Bunny


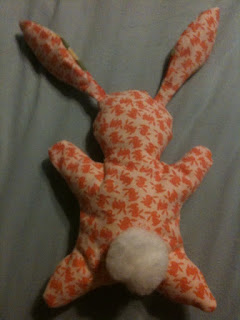
I also decided to make a bunny out of some left over bunny fabric today.
This is the fabric close up

I got the free pattern from: http://chezbeeperbebe.blogspot.com/2010/03/tutorial-and-pattern-recycled-mooshy.html

Step 1: I cut out the pattern
For the inner ears I used left over fabric that had carrots on it.
I then sewed together the ears and stuffed them a little bit.  I then embroidered the face.
I then attached a white pom pom for the tail and then sewed it all together.

Turtle

I just finished making this stuffed turtle! It is so fat and cute.

I got the free pattern and followed the tutorial from: http://www.makeit-loveit.com/2011/06/stuffed-fabric-turtles-with-pattern-pieces.html 
This tutorial was very detailed and easy to follow.  Making it a quick and fun to make turtle.
My only changes to their turtle was that I added buttons for eyes, and that I didn't use different fabrics.  I really like how colorful theirs is but this was the only scrap fabric I had on hand today.

Step 1: Cut out the pattern

Step 2: Sew together all of the legs, head, and tail
Step 3: Sew together the back pieces, attaching the head and tail.  Then attach all of the legs, and then the bottom of the shell
All Done!


Monday, May 16, 2011

Armie the Dragon/Flying Armadillo

I graduated from college 2 days ago and I have now made this dragon.
 I got the free pattern from:
http://www.wyrm.org.uk/cuddly/beanbag.pdf

I doubled the pattern when I printed it and did not make it into a bean bag.
All of the top pieces I did on gray fleece. With buttons for eyes
All of the bottom pieces I did with white fleece
I then added a red fleece ribbon for some color
Making a dragon for my first post works well with sewing there and back again... Bilbo's first adventure involved a dragon named Smaug....

It is a friendly dragon/flying armadillo which boyfriend named Armie for me.  He has his flaws but I'm happy.

Tuesday, January 11, 2011

Merry Christmas and Happy Sewing!

I got my first sewing machine for Christmas and I am really excited to learn how to sew.
It is a Janome 8050
This blog will be dedicated to my progress and projects in learning how to sew. I have done hand sewing before and I made a twin sized log cabin quilt... so I do have a tiny bit of experience.
I can't wait to learn something new and I will post as I work on and complete projects.